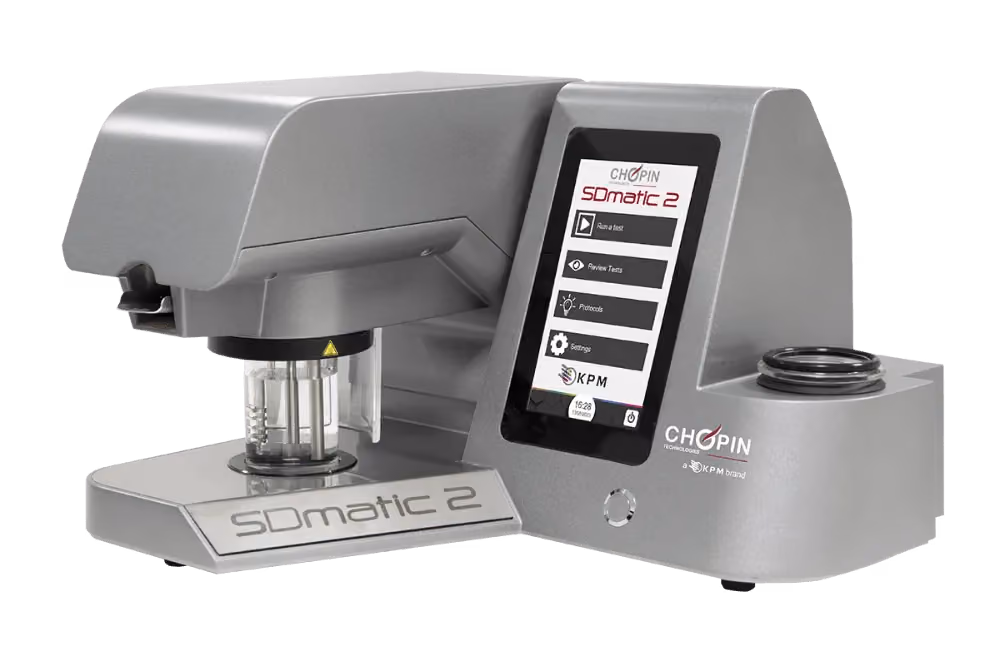
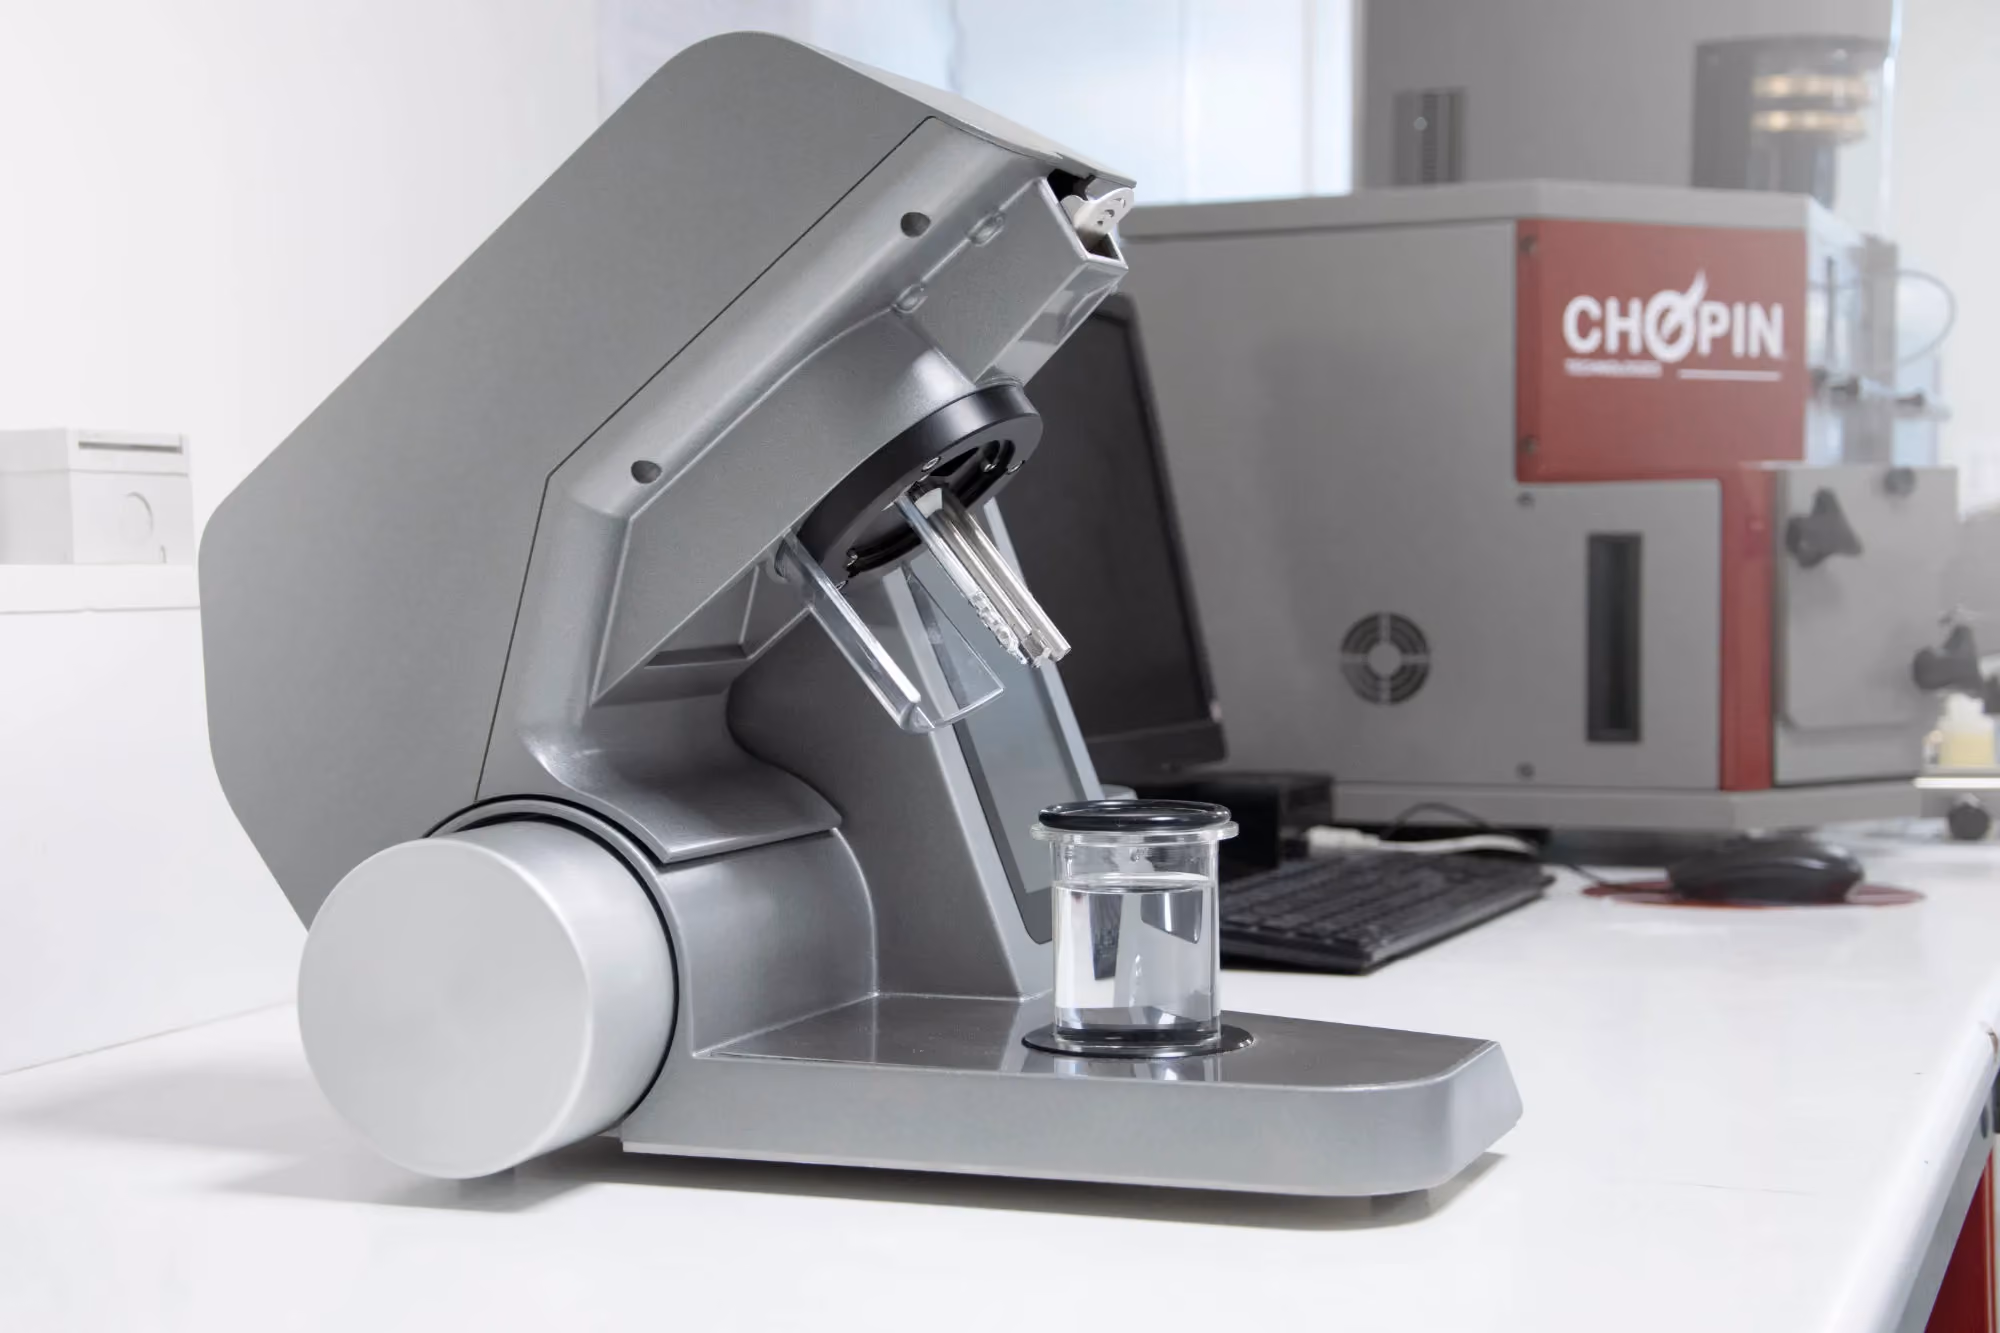
The CHOPIN Technologies SDmatic 2 is a simple and precise instrument, based on the amperometric method (Medcalf & Gilles), used to measure damaged starch in flours for the milling and baking industries. It is a fully automated enzyme-free analyzer that produces a reliable measurement of starch damage with only one gram of flour and within 10 minutes.
Control Flour Quality by Analyzing Damaged Starch
Damaged starch is naturally produced during the milling process and directly impacts flour's properties and functionality. The SDmatic 2 helps millers guarantee that they produce flours according to the specifications of their customers. For the secondary processing industry, it is a cost-effective tool for raw material quality control and to predict and control processing and end-product quality.
Benefits
- Build specifications using an amperometric method recognized by all the milling and baking industries.
- Provides accurate, reliable data measurement: it is a standardized method, the analysis conditions are easy to control, and there is minimal human handling. This guarantees precision, reproducibility, and repeatability of the results.
- New generation equipment, redesigned for ease of use, easier maintenance and lower cost of ownership
- The automation of the analysis increases efficiency and productivity: the test is quicker than other methods, without the need for additional equipment or highly trained people. Lab operators are thus freed-up from tedious tasks.
Features
- Fully automated enzyme-free analysis, based on the recognized amperometric method, Medcalf & Gilles.
- Results in 10 minutes
- Only 1 gram of flour needed for testing
- Results in various measurement units (AI%, Chopin Dubois units, Equivalents AACC 76-31, Farrand - alternative enzymatic methods)
- Embedded software, enabling data storage and the development of new protocols.
- Export data to LIMS (using a script), either on a USB or via network (using Wi-Fi, or Ethernet cable)
- Connection network for maintenance through Teamviewer
- Compliant with international standards: NF EN ISO 17715:2015, ICC 172, AACC 76-33.01.
- SDmatic 2 results are strongly correlated with those of enzymatic methods. Therefore, it is possible to develop custom calibrations and install them on the instrument.
Applications
Understand Flour Baking Capability
The SDmatic 2 measures the level of starch damage in flour. This provides information on the flour baking capability: damaged starch multiplies the capacity of water absorption, and this impacts stickiness of the dough and leads to higher sugar production, which impacts the volume and color of final products.
There is an optimum starch damage content for each product:
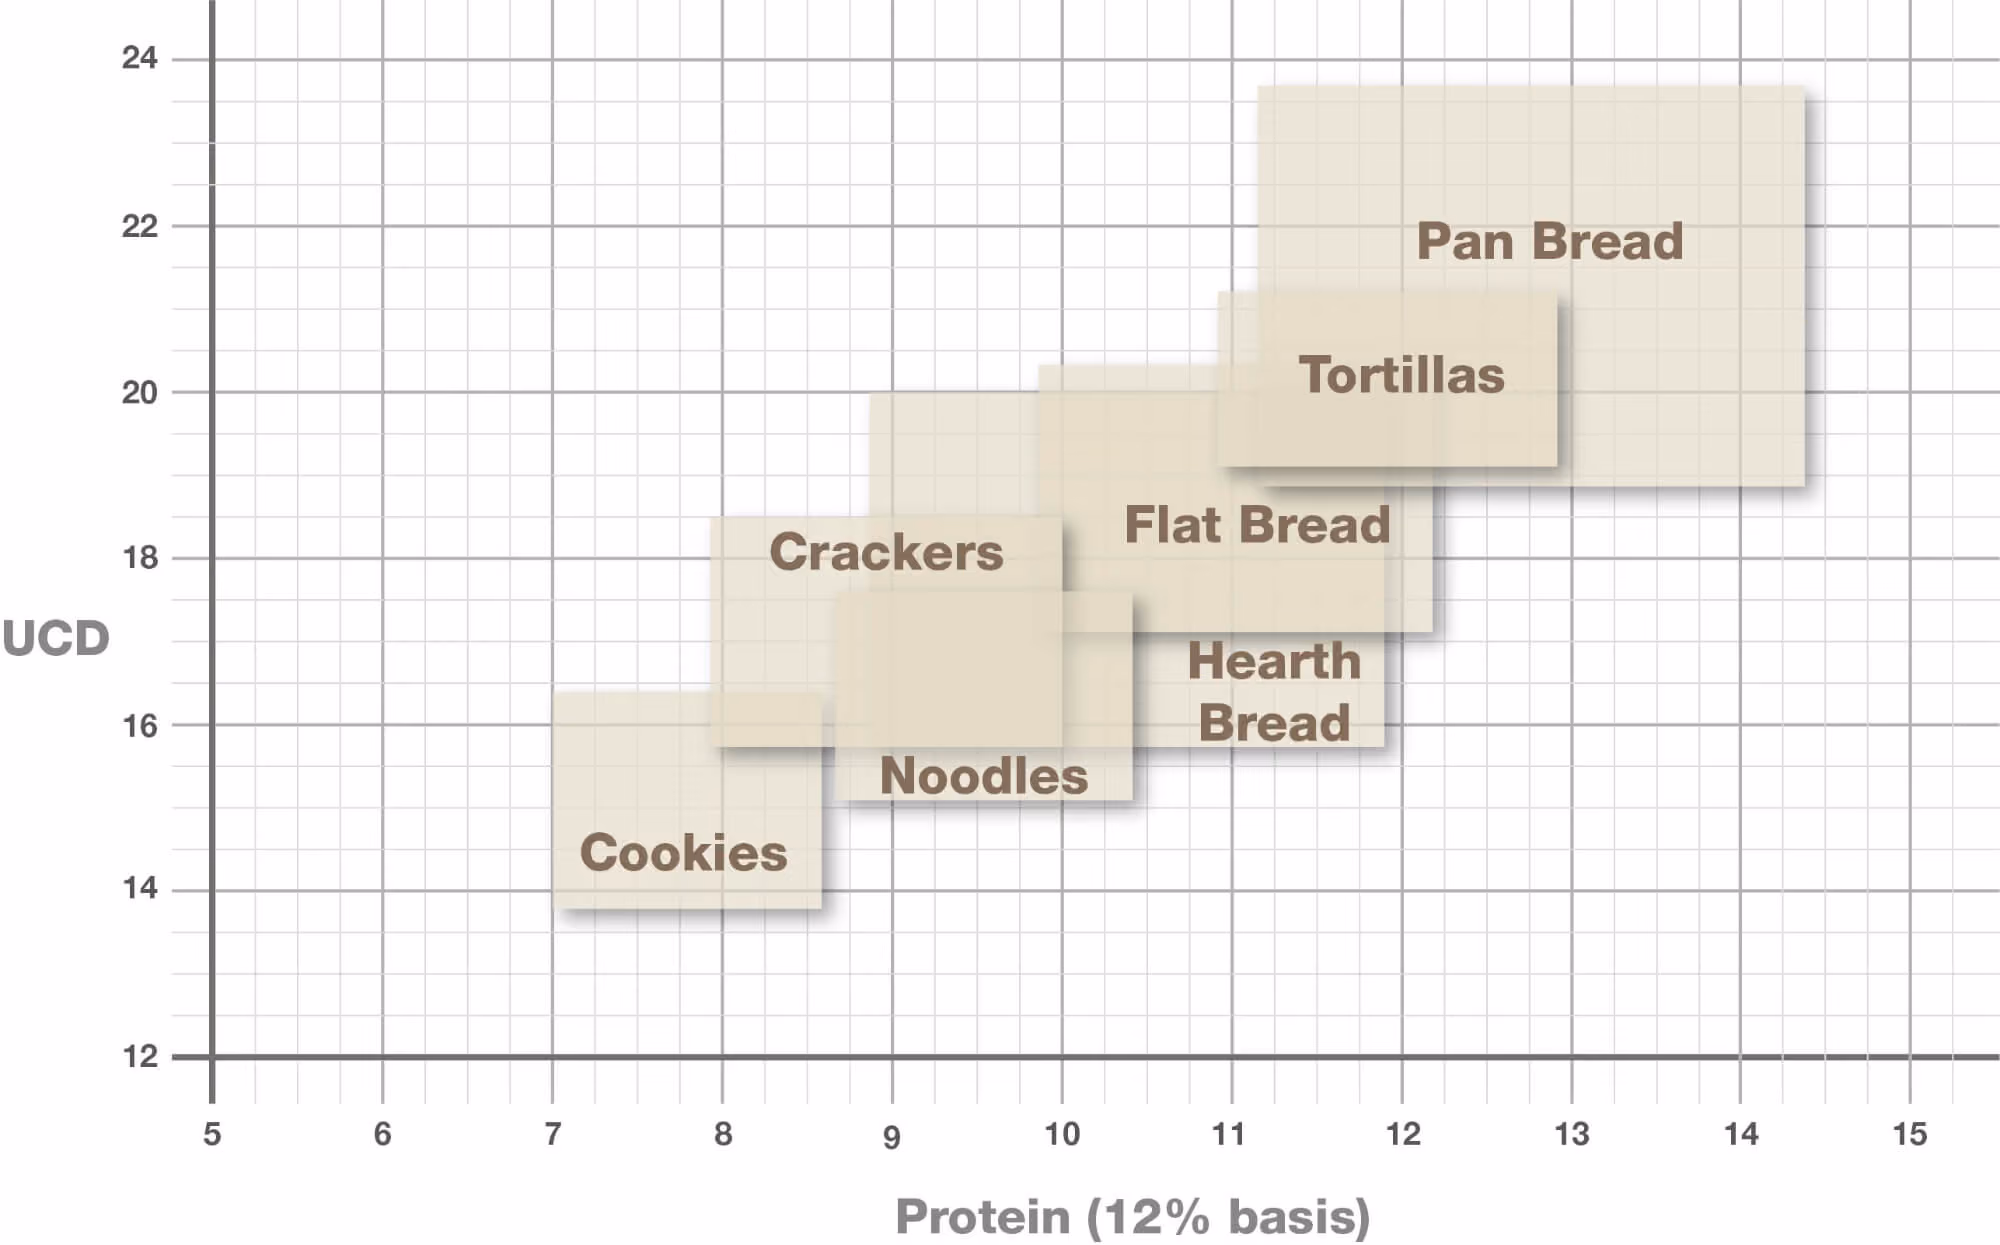
Learn more about Damaged Starch here.
Millers and Bakers can measure the level of damaged starch in flours in order to:
- Ensure optimization and settings of the milling process (rolls, parallelism, wear).
- Produce flours according to the customer's specifications.
- Ensure a flour of optimal and constant quality.
- Optimize and control processing (hydration rate, mixing, proofing, and cooking) and ensure the quality of finished products (volume, color, and shelf-life)
- ~Define the optimal hydration rate to obtain a maximal yield while avoiding the risks of sticky dough
- ~Optimize the addition of additives in the flour (α-amylase, for example) to maximize volume and color, while limiting the risks of collapse and too much red coloring


Product Lineup
How It Works
A Simple and Precise Instrument for Millers & Bakers
The SDmatic 2 measures iodine absorption in a diluted flour suspension, at a temperature of 35° C. The more the iodine is absorbed by the starch, the more the starch is damaged. The measurement principle is based on the amperometric method (Medcalf & Gilles).
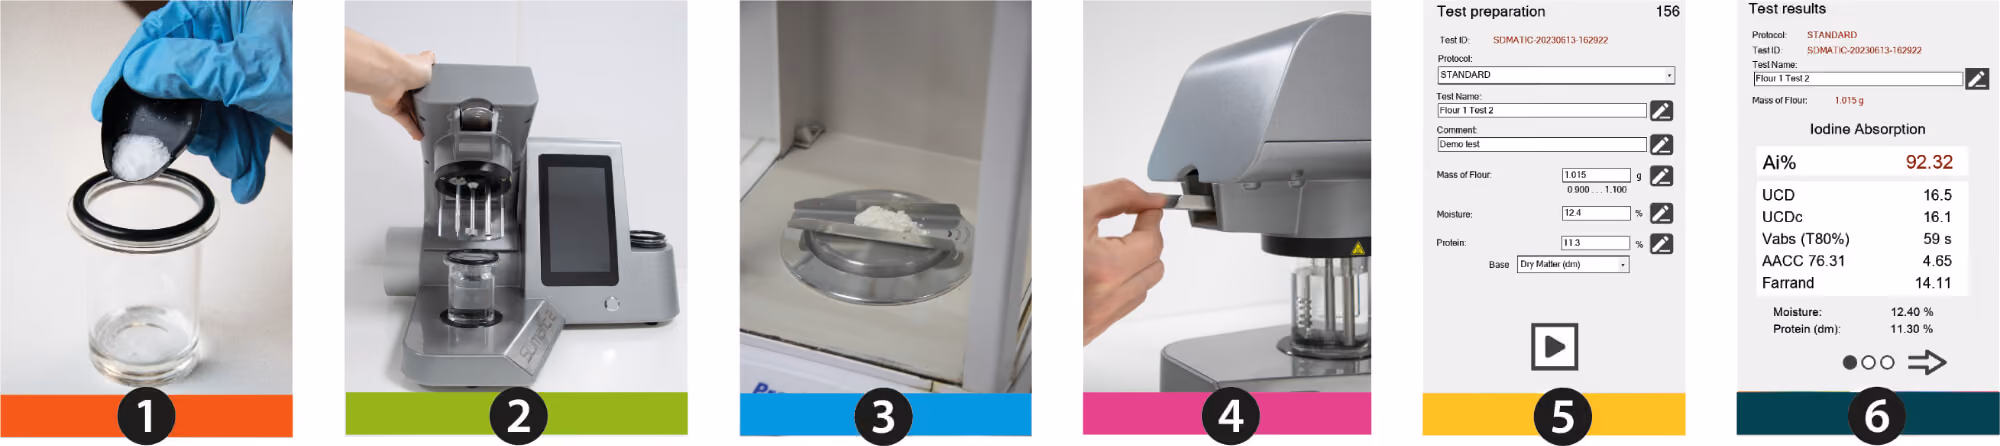
1. Prepare a solution made of:
- 120 ml distilled water
- 3 g potassium iodide Kl
- 1.5 g citric acid C6H8O7
- 1 drop of sodium thiosulphate Na2O3S2
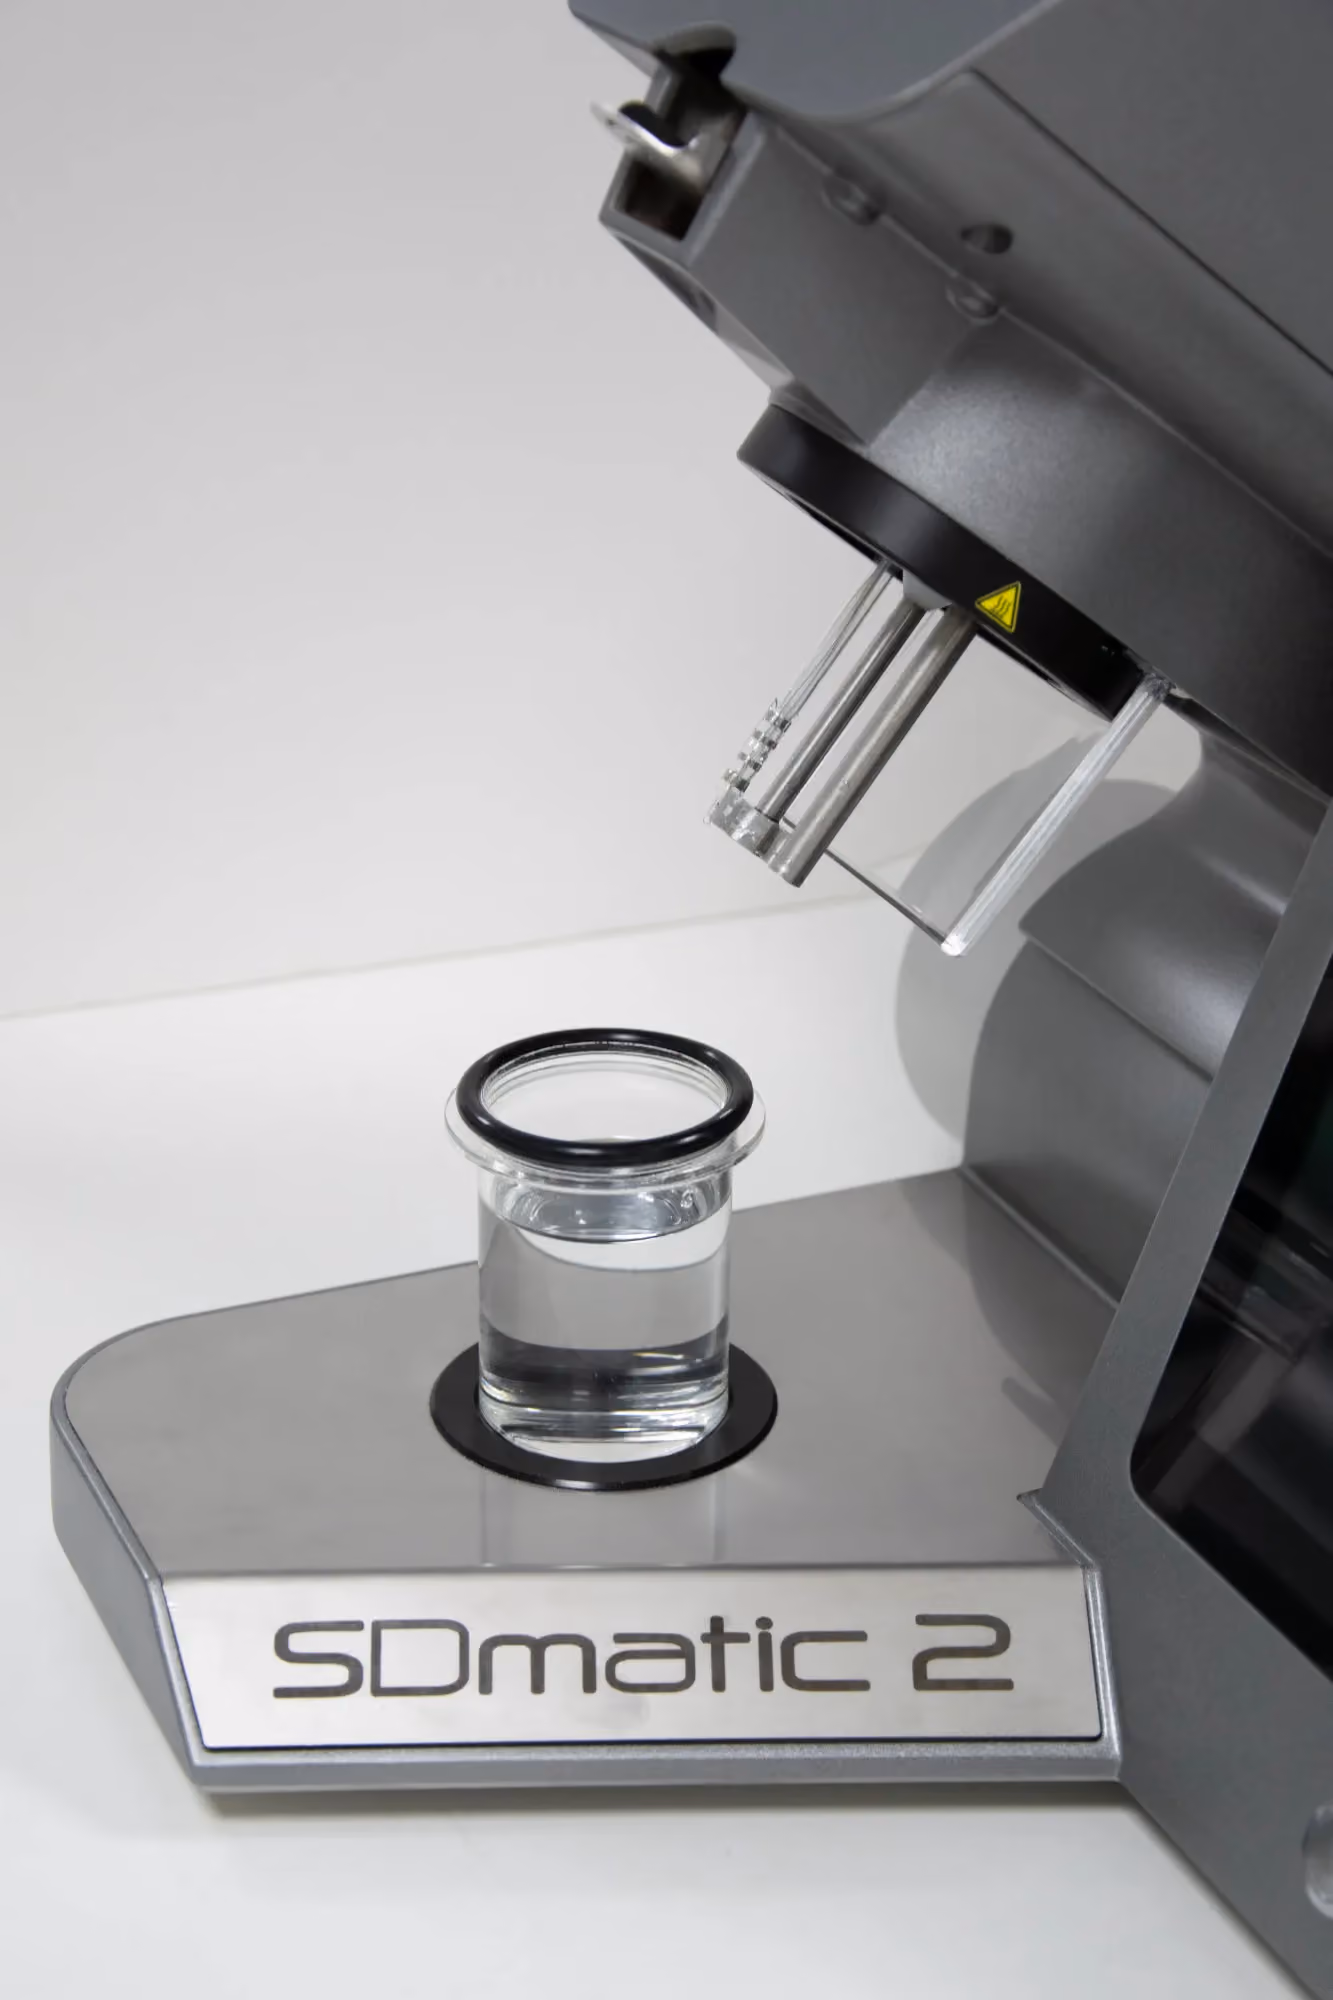
2. Place the solution on the reaction bowl
3. Weigh 1g of flour in the spoon
4. Insert this spoon in the SDmatic 2
5. Configure the test and press Test
- When the solution reaches 35° C (3 to 5 min) the flour is automatically incorporated into the reaction bowl
- 3 min after putting the flour into the bowl, the SDmatic 2 displays the damaged starch content of the sample (5 different units including two with options)
6. Review the results

The amperometric method is based on the work carried out by Medcalf & Gilles (1966), which proved that the iodine absorption capacity of flour is proportional to its starch damage.
Iodine is electrochemically produced using a special probe. Freeing up iodine leads to an electrical current being created, which is measured using a pair of electrodes. The special probe and the electrodes are reunited in the SDmatic 2 measuring probe (see below). The SDmatic 2 stirrer mixes the solution throughout the test.
The solution is brought to 35° C / 95° F by the SDmatic 2 heating resistor.
When the flour is incorporated into the reaction bowl, the damaged starch will absorb the iodine and the measured current will decrease: the bigger the drop, the greater the damaged starch content.
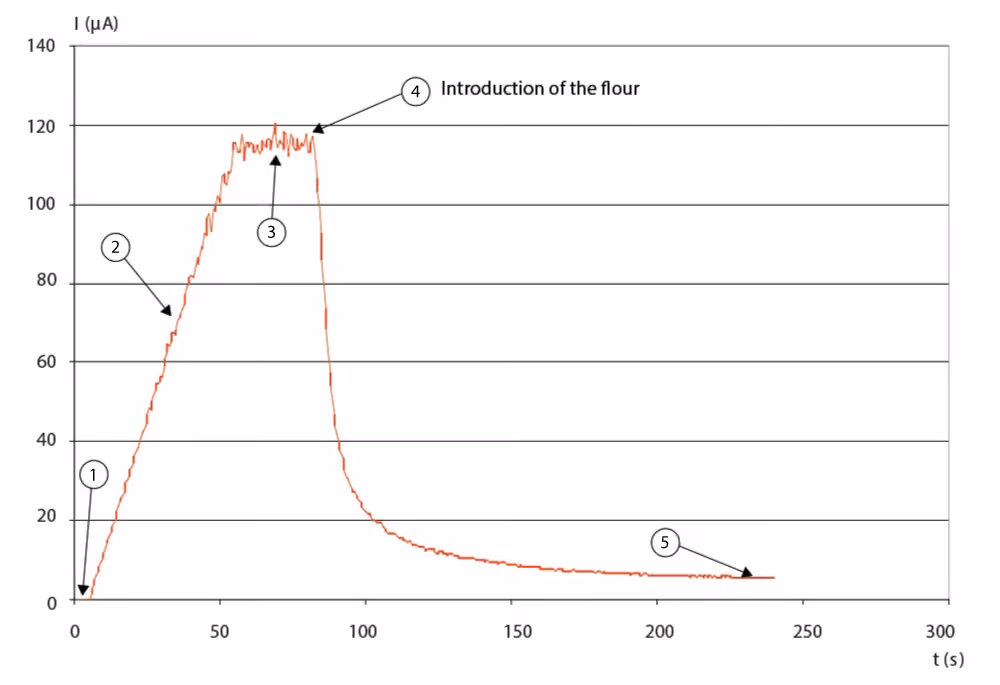
Measurement Cycle
The evolution of the electric current is correlated to the evolution of iodine. It is the electric current that is measured.
Phase 1: The element brings the solution to the correct temperature (35° C).
Phase 2: The probe electrochemically produces iodine as a function of the mass of flour introduced.
Phase 3: The plateau measures the exact current(i.e., iodine) created (maximum value (lm))
Phase 4: At the end of the plateau, the flour is introduced, and the iodine is fixed. The current decreases as a function of the absorption of the iodine
Phase 5: After 180 seconds, the probe measures the value of residual current (Ir). The higher the drop, the greater the damaged starch content.
Results
At the end of the test, the results are displayed:
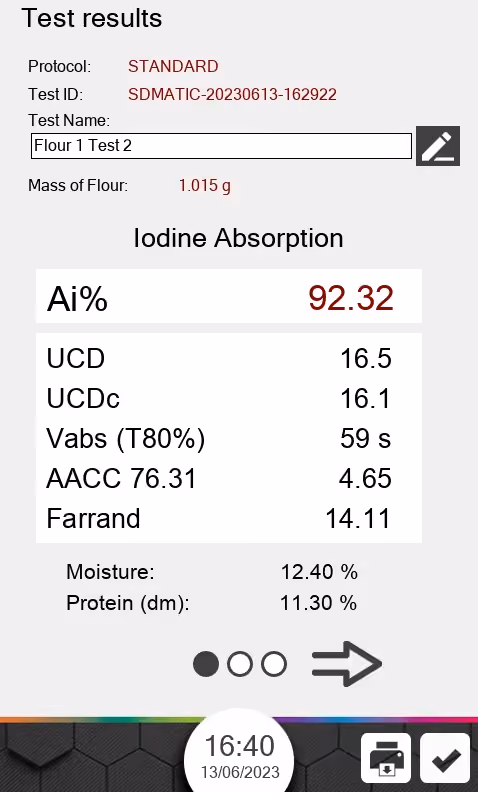
- The level of starch damage is expressed as Ai% (iodine absorption)
- Then it's transformed into UCD and UCDc (corrected value takes into account the levels of moisture and protein)
- Equations can also be used to calculate the equivalence in other units, including the enzymatic methods (AACC 76-31.01, Farrand).
- ~AACC 76-31.01, Farrand is already installed in the Software
- ~You may develop your own correlations to display other measurements
To express the results in UCDc, it is necessary to parameter the H20 and the protein levels at beginning of the test.
Those levels can be determined using an EM10 and/or a NIR system, such as a SpectraStar.

System Components
The SDmatic 2 is equipped with:
- A 7” color touch screen
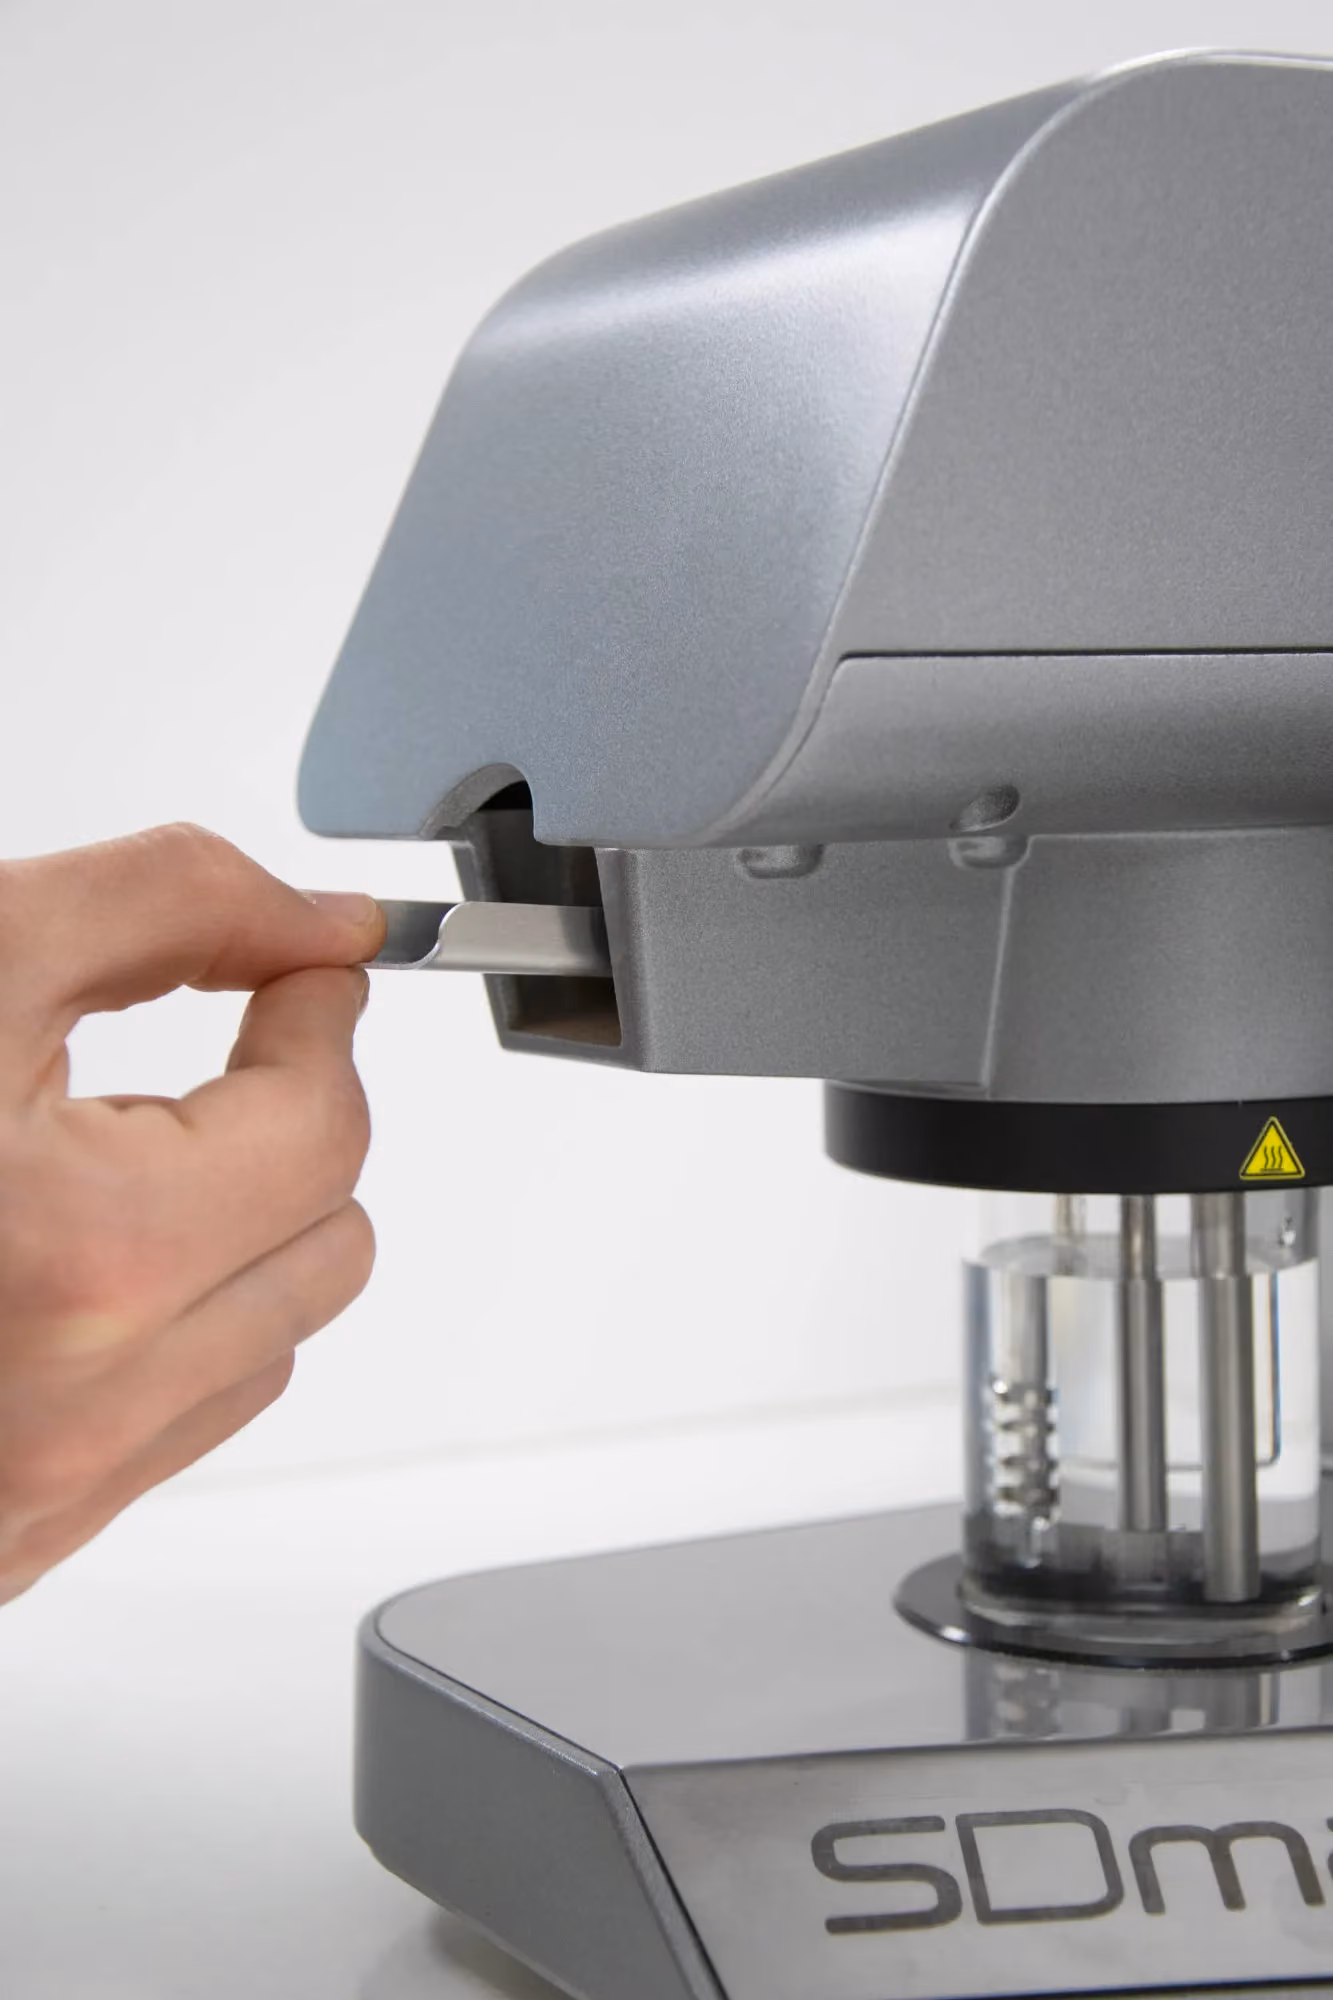
- A plug an play measurement probe, that has been redesigned to allow the user to install or remove it easily and safely, eliminating the need to have technician on-site and saving costs
- A stirrer
- A heater resistor
- 2 reaction bowls
- 2 metallic spoons, allowing the user to clearly identify when cleaning is necessary, preventing cross-contamination or inaccurate sample sizes
- A cleaning container
- A heating compartment for a flask with a solution
- A dropper for the thiosulfate
- 4 USB ports (for USB sticks, barcode scanner, printer - not supplied)

Software
The integrated control software offers a wide range of settings, such as learning mode, choice of units for expressing results, countdown timer, etc. The user selects their actions on the touch screen, following the various menus and their self-explanatory icons.
The integrated control software offers a wide range of settings, such as learning mode, choice of units for expressing results, countdown timer, etc. The user selects their actions on the touch screen, following the various menus and their self-explanatory icons.
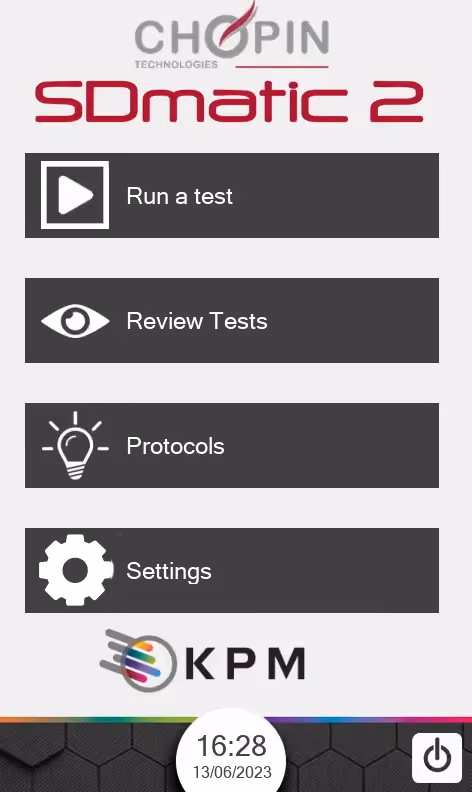
The Home Screen
The main screen gives the user access to all the SDmatic 2’s functionalities - from test configuration to history, protocol selection/definition and settings.
The Home Screen
The main screen gives the user access to all the SDmatic 2’s functionalities - from test configuration to history, protocol selection/definition and settings.
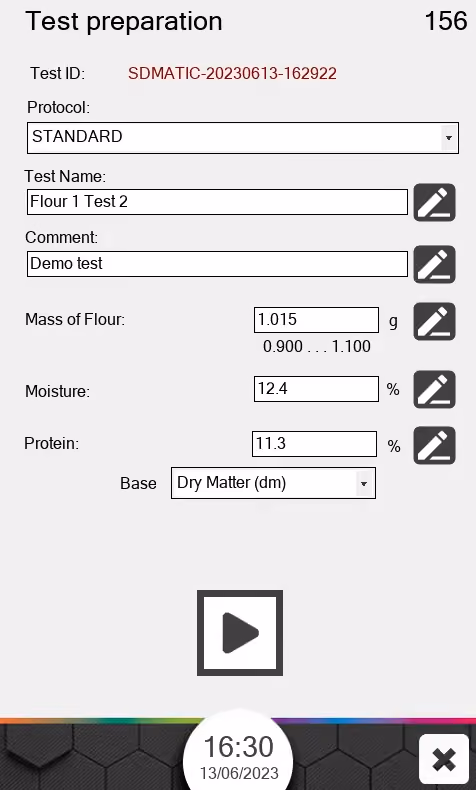
Test Preparation
At this step, the user selects the protocol, enters a name for the test, and indicates the exact mass of flour. Moisture and protein are optional values at this stage.
Test Preparation
At this step, the user selects the protocol, enters a name for the test, and indicates the exact mass of flour. Moisture and protein are optional values at this stage.

Test in Progress
The software will follow the steps and indicate the status.
Test in Progress
The software will follow the steps and indicate the status.
Test Results
The results are displayed at the conclusion of the test, in various units.
Test Results
The results are displayed at the conclusion of the test, in various units.
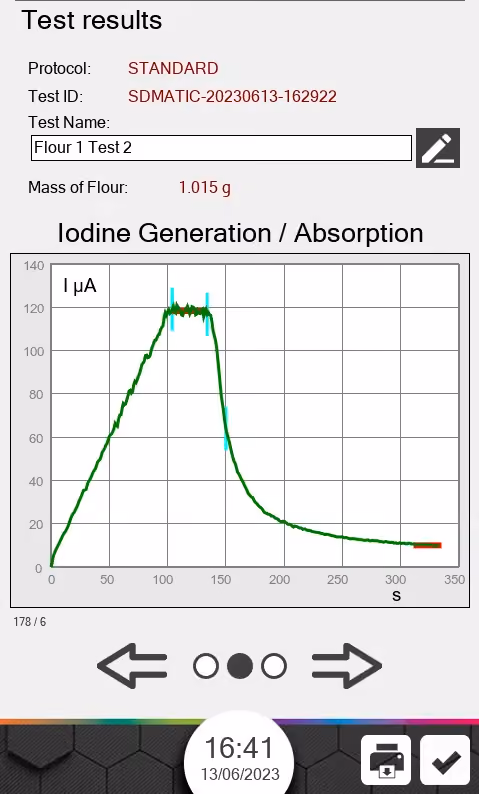
The Results Curve
The test steps are reproduced in a curve that follows each stage.
The Results Curve
The test steps are reproduced in a curve that follows each stage.
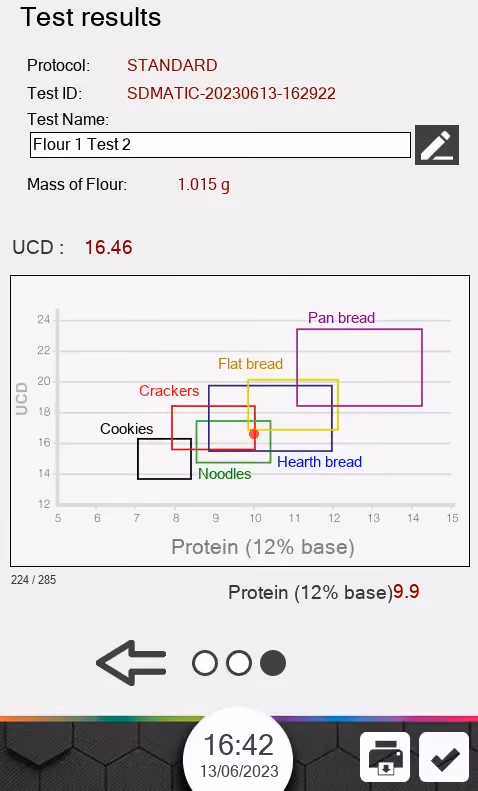
Comparison Table
The test results are included for reference in a comparison table by product type (available only if protein has been initially indicated).
This allows the user to see immediately whether their flour has the qualities required for a specific production run.
Comparison Table
The test results are included for reference in a comparison table by product type (available only if protein has been initially indicated).
This allows the user to see immediately whether their flour has the qualities required for a specific production run.
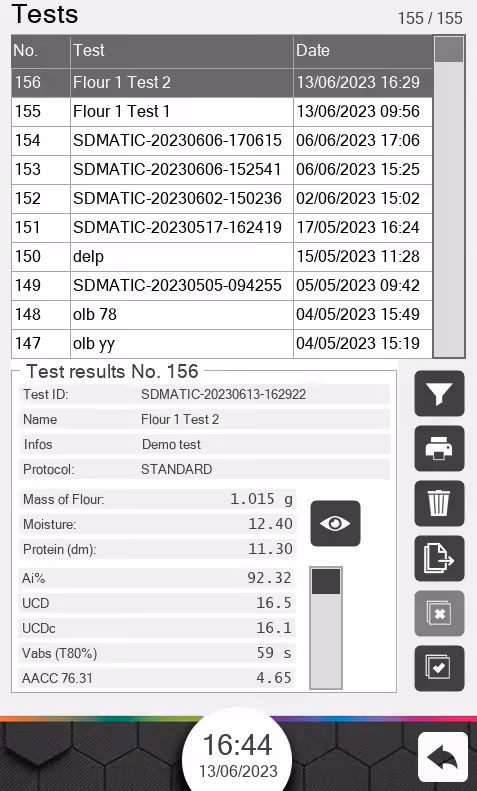
Review Tests
The user can access all tests performed to view, display, export or delete them.
Review Tests
The user can access all tests performed to view, display, export or delete them.
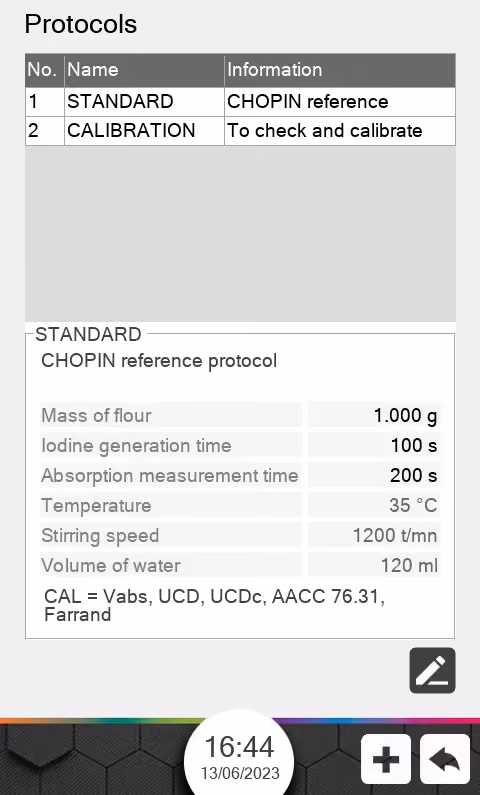
Protocols
2 protocols are factory-installed: STANDARD (ISO 17715, AACCC 76-33, ICC172) and CALIBRATION.
Other protocols can be set.
Protocols
2 protocols are factory-installed: STANDARD (ISO 17715, AACCC 76-33, ICC172) and CALIBRATION.
Other protocols can be set.
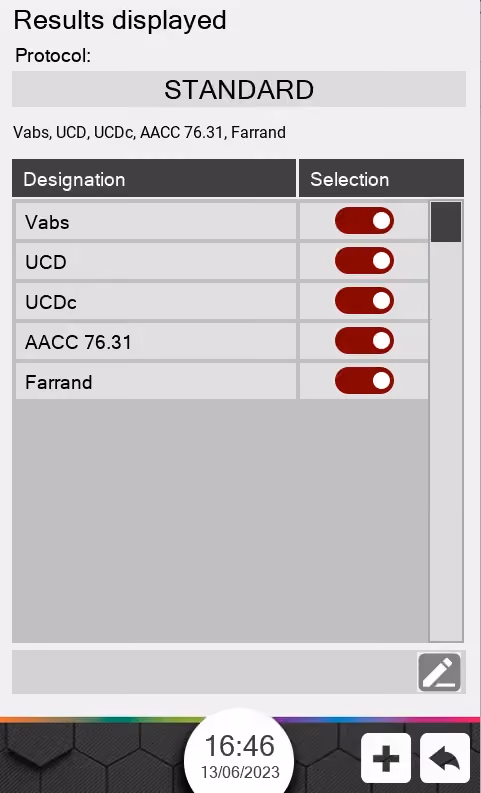
Measurement Units
Measurement units can be customized by protocol.
Measurement Units
Measurement units can be customized by protocol.
Accessories
Specifications
Frequently Asked Questions
Yes, the milling process always causes a degree of damage to starch, but it is important to understand the level of damage and how it will affect the final product.
Resources